Wednesday, July 22, 2015

Going Paperless


My work recently decided to go paperless.  They say it is because they want to help the environment….and to save money.
For whatever reason, it is a decision that I can get behind.

Even though it is something I back 100% the transition has not been easy for me. I like being able to have visual clues, things I can touch to help keep myself organized.
For me out of sight is completely out of mind. 

For auditing purposes we have to keep everything on file for 2 years.

For each claim we have to have the appropriate backup. Sometimes claims need 72 pages of backup.  With the amount of claims we process each day we were going through a lot of paper.

Like A LOT OF PAPER.

How we are solving this is by “printing” to PDF and saving everything to a website.

How do you print to PDF?
Here is a how to YouTube video that explains it more thoroughly and more simply than all of my attempts.


 I think the whole process is pretty slick and works remarkably well.

The only issue that I have is each time you print to PDF you lose some clarity. So if you do it too many times whatever you are printing gets illegible.

The way I avoid this is by planning out what I am going to do, from start to finish so I don’t have to print to PDF too many times.

“Printing” only once is the goal. That way minimal clarity is lost.

This does mean that I sometimes have like 7 to 10 things open all at once, and it does get a little overwhelming, but it is doable.

This is good and bad, I have to slow down and plan each step. So I am less likely to make mistakes now, but I can’t process claims as fast.

I have to have visual cues to help me stay organized. I use to have stacks of paper all over the place and I was constantly shuffling them, now that they are gone I had to find another method.

What I have now is a tracker in Excel. It is much easier and faster to use.  Anytime a claim touches my desk it gets added to the tracker. It is constantly open , which makes it a wonderful visual aid for me.

One of the benefits of Excel is it makes searching for specific things very easy (Ctrl-F) and it makes transferring information quick and seamless (Ctrl – C and Ctrl – V).


After officially going paperless I can count on one hand how many times I have printed, and you know what. That makes me feel good. I feel like I am actively doing something that will affect the future. 

Sunday, July 12, 2015

Everything I know about Running pt1

Everything I know about running.
FYI this is going to be an ongoing post.
as I remember things or learn new things I will add to it

Running is how I plan on surviving the zombie apocalypse. My fight or flight instance only goes one way.

 I have always done sports, but I didn't get into running until my senior year of high school.

Then I stopped until my mid twenties.

Anyhow enough backstory


  • Most people, in fact I believe all people hate running. You would be crazy not it, its hard and it hurts. Runners have trained there brains to think otherwise. It is this "brain training" that makes them bat shit crazy, and a superior species. 
How to train your brain 
  1. When it is time for me to go for a a run I don't think about it. If I think about it I can easily think about it. It is not until I am outside actually running that I let myself think about it. At that point it is is "well funk, I am out here, might as well finish it." 
  2. Think about why you are running. My mantra goes "skinny jeans, wearing leggings as pants, short shorts, short skirts, drinking lots of beer...ect"  
  3. I know this sounds dumb, but as you are running smile. True story. When you smile it sends happy chemicals to your brain that makes you think you are happy. I tried this when I was running on the green belt. Every time  I passed someone I smiled at them. When I finally finished I had run further and felt hella pumped. It was awesome.  
  • Have some good music. For everyday running I need music. My Dad who has been running since birth (I assume) does not listen to music, but he is so hard core it is unreal. I don't listed to music when I am racing, but for the everyday stuff I need some good jams. 
    • I have a playlist called 'bad asssssss" and it is all of my favorite quick tempo music, the kind that come on and they make you want to get up and dance. I tried having one of my faves that had a slower tempo and when it came on I slowed down my running pace so it had too go. 
  • Have good gear. SOOOOO important. Things like non chafing panties and socks. You will not know the importance of this until you have lived through the agony. 
  • Get fit for your running shoes. Running shoes are expensive, but I have had the cheep ones and suffered for it. I went with my Dad to his friends running store and got professionally fitted. WORTH IT, worth it 100 times over.  
  • Stretch. When I get home after a run all I want to do is get out of my smelly running cloths and take a shower. In fact, I did this and earned myself a nice effed-up IT band and had to take several months off running. Now I stretch, throughout the day even. After my run I do stretches and at work I take do some simple stretches.  
And....my attention span ran out, so that is all for today. More to come!

More things I know about running

It makes me feel good. Not just like happy brain chemicals good, but like I can do anything. Like after a run I feel like I could do quantum physics or find buried treasure or whatever. I just ran 4 miles! Nothing can stop me now!

Hydrate, is the name of the game. Running makes you sweat, you need to put water back in your body. Drink lots and lots of water, until your pea is light yellow to clear.

Weather. If you wait for the perfect weather to go running, you would never go. During the summer I run in the mornings when it is cooler, in the fall I run after work in the evenings when it is warmer. I am also toying with the idea of getting a treadmill so I can still run when everything is covered with snow and ice. I hate treadmills, but it is better than not running for weeks.


Chafing and blisters. Two terrible horrible things. How to avoid them. Get your shoes fitted by a professional. Get socks and workout gear made out of something other than cotton. Cotton is your worst enemy. It will hurt you every time. For super sensitive areas like your armpits or between your legs you can use Glide or Vaseline to prevent injuries. 


Saturday, July 4, 2015

Vegan Cheese

Vegan Cheese attempt 1
Perfect Texture! 

Cheese is something scared, it is so good. The way it melts, the way it tastes, the way it...*inset love ballad* 

Dairy is, to my great dismay, one of the things that make my body go into instant reject mode. I could do without milk, there are lots of other options...but CHEESE!!!!

Needless to say I had high expectations. 

Vegan cheese...hmm...sounds like some kind of mad science experiment.. 

I used this recipe 


Vegan Cheese attempt 1
Main ingredient, cashews soaked overnight

It was remarkably easy to make.

I didn't have to wait long for it to thicken up either. 
Vegan Cheese attempt 1
Simple recipe, superior results 

The texture was perfect. Exactly like real mozzarella...but it tastes like plain oatmeal. 

That is OK! Flavor can be added. The texture is there! What we have is a blank slate and it is exciting!


Do you know of another stellar vegan cheese recipe? Do you know how to achieve cheese flavor? 
Send me an email or let me know in the comments!

~ Laura  

Friday, July 3, 2015

Glitter Jars (AKA Timeout Jars)

Glitter Jars (AKA Timeout Jars) We all deal with it at work. It is unavoidable. One way of dealing with it is to take a step back and count to 10. 

Most of the time I am not in that frame of mind. I hit my mental wall and lose the ability to make good decisions.
Glitter Jars (AKA Timeout Jars)
If you use different sized glitter they will fall at different rates

A most amazing coworker made everyone “time out” jars. 

They are glass jars with glitter in them. When you shake them the glitter swirls around and as it falls you return to your “center”.

Glitter Jars (AKA Timeout Jars)
I used glass jars, but if you worry about them breaking use plastic
I may not be in the right frame of mind to stop and count to 10, but I can take a second to stop and play with glitter.

Now before I send that snide email or after reading a particularly rude email I sit back and give my timeout ja
Glitter Jars (AKA Timeout Jars)
Glitter! 
r a shake.

It also makes conference calls much more enjoyable.

They are very easy to make.
You will need
1.  A jar. Glass or plastic
2 Glitter
3 Clear glue (I use Elmers)

Wash the jar (see the post for how to removed labels), put the glitter in it. Add water and glue.
The glue is what slows the glitter down. So if you want a really long “timeout” add more glue than water.

Put the lid back on the jar and give
it a shake!

` Laura 

Sunday, June 21, 2015

Kombucha pt2 Flavoring

Now that you have made a perfectly tart and tasty batch of kombucha, it is time to flavor it.

Recommended equipment for this is a funnel, lots of towels, and something to put the F2 (second fermentation) in. 
Kombucha pt2 Flavoring
All equipment in use...

Megan uses fliptop bottles, and I made mine in mason jars.

As long as they have a nice tight seal you can use whatever you want.
It is the combo of the tight seal and the kombucaha continuing to ferment that makes the fizz. So it is important to make sure that whatever container you use can withstand pressure.

Anyhow...

Flavors. 
Kombucha pt2 Flavoring
The flavor combo I used today 
Usually folks use fruit or fruit juice in the kombucha to add the flavor.
There are an unlimited number of flavor combos you can try.  Much like making extracts, it is whatever you want to shove into the bottle.

I drink mine fast enough that I don’t do the F2 anymore and just drink it raw, but when I was doing F2s my favorite combo was cranberries and cinnamon.

Be extra careful if you use dried fruit to flavor the F2. Sometimes extra sugar is added when they are dried and that makes them ferment faster so they are prone to exploding. I added dried figs to an F2 I luckily I opened the jars an hour or so later and they were already pressurized!
How to F2

1. Remove the SCOBY

      a.       I rise my hands with white distilled vinegar. Don’t dry them or touch too many things other than the SCOBY to reduce cross contamination.
      b.      Another method is to use a clean ladle to scoop out all up about of the kombucha.

2. Using either method get all but about a cup of the kombucha into to the seal-able containers.

3. Add whatever you are using to flavor the F2.

4. Seal and store the bottles somewhere warm and dark for 1 or 2 days.
5. Burp your brews at least one a day.
Burping means you open the container to let the gasses that have built up out. If you don’t do this they might explode. Like mini bomb explode.
Sometimes they erupt like a geyser when you burp them …it’s pretty neat…and messy.

6. After adequate fermentation time move F2 to fringe.

7. Drink and enjoy!

Now, to make a new batch.
Kombucha pt2 Flavoring


Bring tea, sugar, water mixture to a boil.
Let it cool completely
Add SCOBY
Let it ferment
WOOHOO!


Kombucha
Warning!

When you first start drinking kombucah it will make you poop something fierce. Like crazy poop. It’s icky, but it’s normal. It is the probiotics doing their job. Your body will work it out and reach equilibrium again and you will feel fantastic.
Also, please note that kombucha is a fermented drink, so there is some alcohol in it. Usually between .5% and 3% depending on fermentation time)

Let me know your favorite flavor combos or any kombucha misalps. My email is ladybydayhomesteader@gmail.com, or find me on Twitter at @ladybydayhomestead. 

~ Laura 


Thursday, June 11, 2015

How to Make Kombucha

The first time I had kombucha, my Mom decided to try it because she had read about the health benefits and wanted to give it a go. I thought it was the nastiest drink ever.
Flash forawrd a year or two....
Kombucha kept showing up on my Pinterest, feed so I gave into peer pressure and started to read more about it.
Kombucha has been around for a long time (believing to have originating in China). Unfortunately there is very little, actual, medical research to back up the magical elixir.
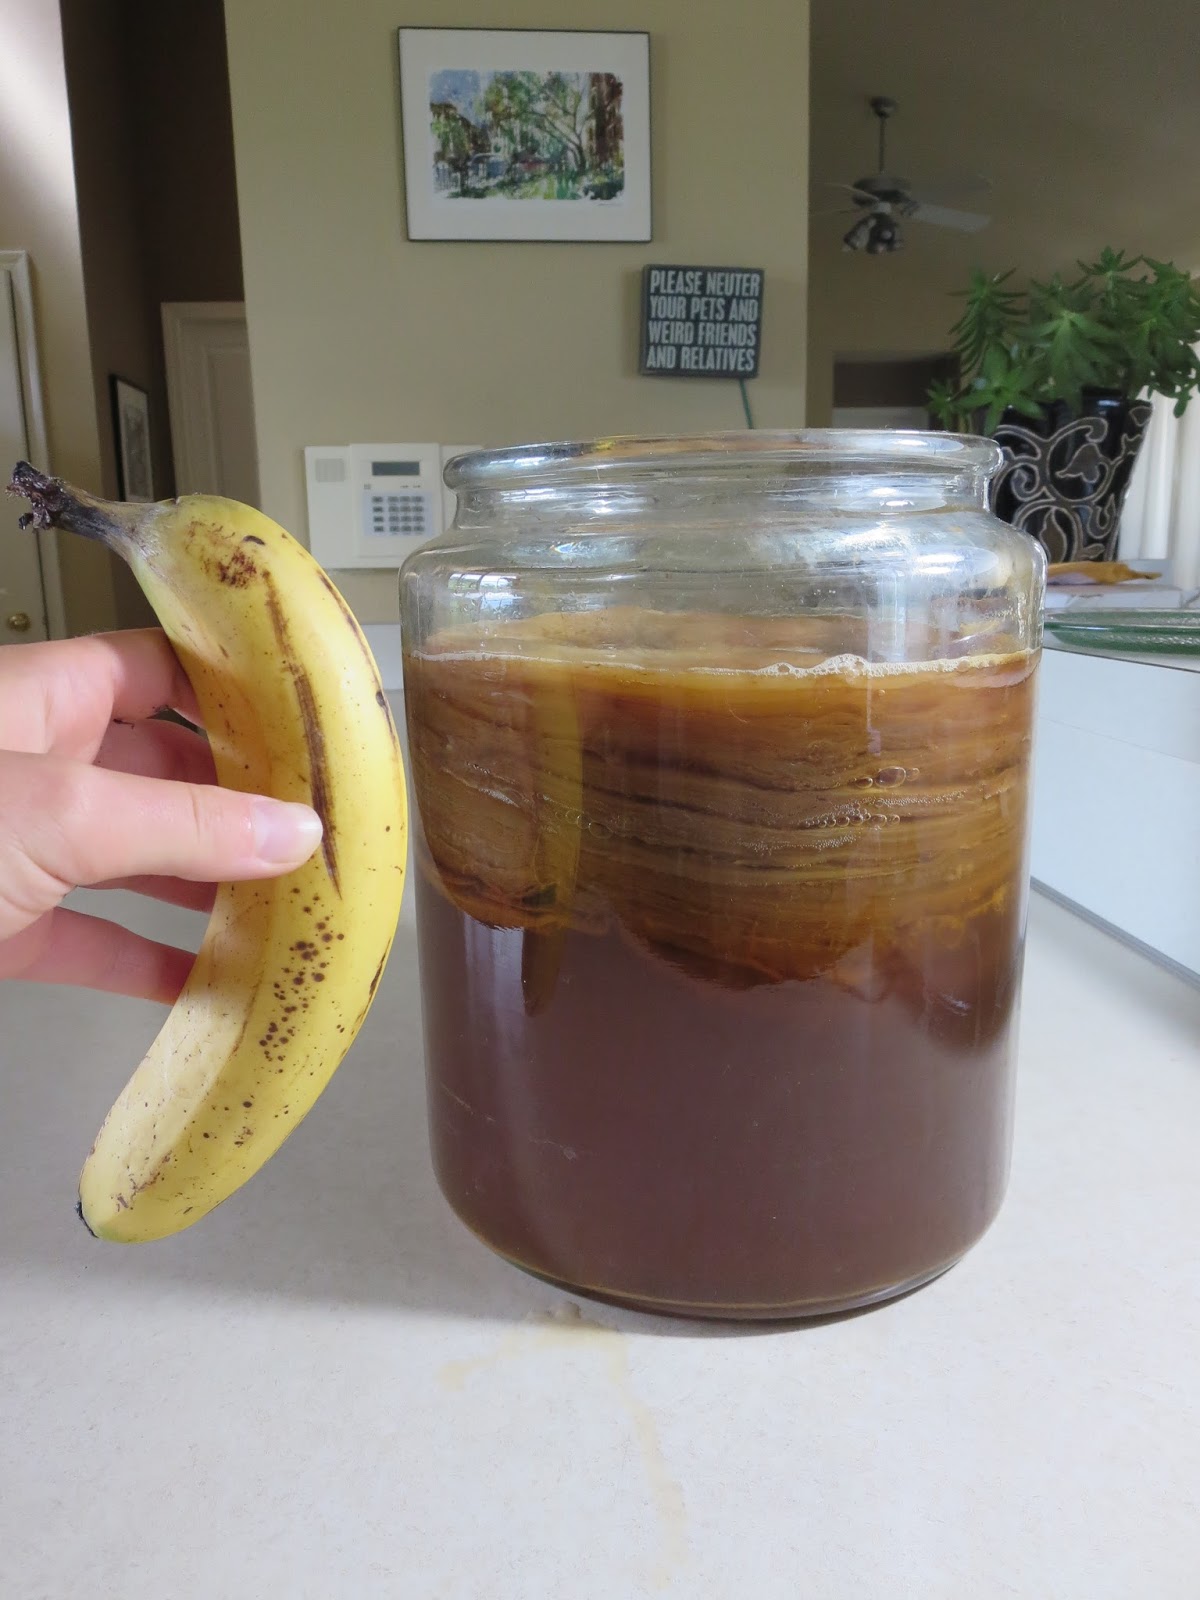
Monster SCOBY (banana for size )
Monster SCOBY (banana for size ) 
Regardless, I think it is amazing and will shout my love for it from the roof tops.
There may not a lot of research to show the benefits of kombucha, but there is a lot of there is a lot of medical research explaining the benefits of probiotics.
Kombucha is jam packed with probiotics. I have had/continue to have digestive issues.  Probiotics help rebuild the flora and fauna of your digestive track. I credit my recovery of my gut to drinking kombucha.
Buying kombucah from the store is expensive. Usually for a bottle of the magic juice you are looking at about $4. While it is worth every penny, you can make your own at home for much less.  
Kombucha is fermented tea, the magical creature that assists with the fermentation is called a SCOBY.
If you know someone who makes their own kombucha they will probably be more than happy to give you a SCOBY, or you can get them online for a reasonable price as well.
MAKE SURE YOU ARE GIVEN SOME STARTER LIQUID!!!
SCOBY stands for symbiotic colony of bacteria and yeast. It is not a pretty creature, it is looks like an every growing blob of snot. I have seen an article on Facebook a few times saying “once you see what kombucha is made of you will never drink it again” or other such nonsense. You don’t drink the SCOBY. It acts like a lid, it makes a little ecosystem which in turn makes the tasty drink known as kombucha.
There are some serious kombucha drinkers that make candy or facemasks out of their SCOBYs.

Not the prettiest pet, but they make a tasty drink Kombucha
Not the prettiest pet, but they make a tasty drink 
I don’t, not my thing.
If that is something you are interested in here are some links…
Other than a SCOPBY kombucha is made up of tea and sugar. Kombucha needs to be made with black or green tea because it has tisanes in it, which are something SCOBYs need to grow big and strong. Herbal teas don’t have the nutients in them, and they also have oils in them. Oils and SCOBYs don’t mix. I use Tetley English Breakfast tea. This would not pass the scrutiny of most krazy kombucha folk because it is not organic and could possibly have been grown with something other than filtered tears or free range hipsters.
I use it because I can get a lot of it for cheap, and it is the only tea the hubby will drink….
Sugar is the next thing that goes into the kombucha. I use organic cane sugar from CostCo. Sugar is what feeds the SCOBY so getting good quality is import.
You can use honey, molasses or agave. Each type will create a different kind of brew and change the fermentation time.
DON’T use beat sugar or Stevia and Xylitol the SOCBY can’t eat them and it will kill it. DEAD.
Kombucha has kind of a vinegary taste; this is because SCOBYs like an acidic environment. They also love the heat (75 (ish) degrees is perfect).
I killed my first two SCOBYs because I did didn’t have an acidy enough environment and my SCOBYs were to cold.
For my third attempt I added a splash of white vinegar (don’t use anything other than white distilled vinegar, you will kill your SCOBY) and I put them in the cabinet under the sink in the guest bathroom (AKA the hottest place in the house).  Now I have some happy, monster sized, SCOBYs.
Depending on how big your SCOBYs are and what tea and sugar mixture you have made your kombucha will be ready in 3-7 days. I like mine to be more on the vinegar side so I let them ferment for a longer time.
The SCOBY needs to breathe. Cover the jar with a clean cloth and secure it with a rubber band.
Bring it to a boil, then let it cool COMPLETELY before adding the SCOBY
Bring it to a boil, then let it cool COMPLETELY before adding the SCOBY 
As the kombucha ferments the SCOBY will “reproduce” and you will have a new baby SCOBY on the top. Some SCOBYs sink and some try to climb out of the container. Don’t confuse your new healthy baby SCOBY with a dead SCOBY. When SCOBYs dies they get moldy. It will look like bread mold. Kind of fuzzy, not slimy. 
Flavoring kombucha happens during the second fermentation. That will be another post.

Warning!
When you first start drinking kombucah it will make you poop something fierce. Like crazy poop. It’s icky, but it’s normal. It is the probiotics doing their job. Your body will work it out and reach equilibrium again and you will feel fantastic.

Also, please note that kombucha is a fermented drink, so there is some alcohol in it. Usually between .5% and 3% depending on fermentation time)

Let me know what you think in the comments!

Thank you
~ Laura 

Thursday, June 4, 2015

Ladybugs are Neat

Ladybugs in the garden Last summer I was reading on the front patio, waiting for the hubby to get home having some wine...you know…enjoying life.

Our front porch has three large roses. I have mentioned them in an earlier post. Anyway, I was reading when the new growth on the roses caught my eye...

They were covered with aphids.

Hanging out on the patio was now out of the question. 
Ladybugs in the garden
Every evening the hubby sprayed down the roses with soppy water, but that would barely dent the onslaught of the little bugs.

We ended up removing the most infected branches. I was worried that the sudden loss of limbs would kill the roses, but, they continued to grow.

This year we are planning ahead. We purchased 1500 ladybugs off Amazon (The hubby actually came up with this idea <3).

These little aphid eating maniacs are cost effective. $10 for 1500(ish) bugs.
So, math.
Ladybugs are known to eat 50 aphids a day. 1500 ladybugs, 50 aphids a day, that is 75,000 aphids per day!

If you have ladybugs you wont need to put chemicals all over your property. Which is good for pets, kids or adults who like to walk around without shoes...

Even people who don't like bugs (me for example) are more than ok with ladybugs.

I put the majority of them on the roses, and a few of them in the backyard with the veggies.

The thing with ladybugs is...they wont necessary stay in your yard.

There are tricks you can do so that they are more likely to stay.
Ladybugs in the garden


I have even read that you can attract them with raisins

Ladybugs eat more than just aphids. They will eat other soft shelled buggies. They are super neat, super cute, cost effective, chemical free (safe around pet and kids)...I believe that is a win win win win situation!

Share your ladybug story with me! You can also email me at ladybydayhomestead@gmail.com or find me on Twitter at @Ladydayhomested


Wednesday, June 3, 2015

Removing Labels pt3 Lids


Repurposing jars and bottles

Pretty jar lids!
Written by megan

Repurposing jars and bottles

Remember back when we removed all the labels from a zillion jars? We promised *two* ways to cover the lids. Unfortunately, what you're gonna get instead is one method, and a failure! This is still good info because now nobody, but me, will have to clean up a horrific gluey mess! Sorry I didn't pause for a selfie while my hands and counter and life were covered in glue- my first priority was getting it cleaned up before it dried.

You can see what method I tried here or here, those people managed to do it... However, when it came time to cover our jar lids, we only found success using spray paint.

The best part about spray paint is that you can do many of them at once. The spray paint holds (so far) and it covers completely. If you are a crafty person you can do many fancy things with stencils, but for the sake of expediency, we just went with plain.

We bought Rustoleum Universal Textured Paint in two colors, Pewter and Rosemary. It's supposed to hold on both plastic and metal, so it should work for everything we've got. It also claims on the can to be both primer and paint, and thereby saves us a step, which we both agreed was nice.

Pepurposing jars and bottles
Before, mismatched and chaotic  
We prepped our lids the night before by washing them in soapy water, rinsing really well, and letting them dry. This guarantees there's nothing on them that may interfere with the spray paint adhering.

We set up a workspace out in the open air, so we didn't get too messed up on paint fumes. We laid out cardboard until we had something flat and protecting the grass. It wasn't pretty, but it worked. We laid the lids out, trying to keep them far enough away from each other that we could reach all around them.

Then we sprayed! Following the directions on the can, we got the lids from all four sides and both of us walked around several times making sure there were no missed spots. We were supposed to do "two even layers" within an hour of each other, but it's more like three patchy layers within an hour and a half of each other. The two colors we got are black tone and green tone silvery shades that go really well together, and we intentionally combined them in thin patchy layers. The effect is pretty cool, but I would hesitate to do something like this unless it's the same brand/style of paint, for fear of chemical reactions causing weird effects.

We'll update this post if that turns out to be a mistake, but right now they're looking glorious!  After an hour or two, we moved the whole bit of cardboard into the garage, where they could be protected for the full curing time (24 hours according to the can).

Repurposing jars and bottles
Here's my hoard of jars, all ready and waiting to be filled. I'll be reorganizing my pantry soon; emptying out the canning jars I've been storing my dry goods in, so they can be used for canning again. I've also started drying herbs from my garden and they keep so much nicer in whole form in a jar, rather than jammed into a bag in a drawer.

I just got an entire matching, glass, pantry storage set for the cost of two cans of spray paint, a little oxiclean, and some elbow grease, plus about three months of saving every jar and bottle that came through my house. Think about what you threw away or recycled in the last month. What are you discarding that you could be reusing?
`Megan

Saturday, May 30, 2015

Brewing & Bottling Mead

Brewing & Bottling Mead
Mead 101, plus, how to bottle things at home!
By Megan


Mead! What even is mead? It's not wine, and it's not beer, but it can be made at either strength. It's honey, diluted and fermented, turned alcoholic (and aphrodisiacal, and magical, and medicinal, too, if you listen to the old legends about it)!


Fermented honey drinks have been found in every single culture that exists around bees. Early beekeepers would harvest their honey by smashing the entire hive, and the straw basket it was built in, and just letting it drain. Most of the honey would end up leaking out but to get the wax for candles and medicines, the whole sticky straw and wax mess would be boiled. The straw would get skimmed off, and the liquid would separate into beeswax and honey'd water, if you left it alone overnight to cool. The popular idea goes that some beekeeper left it a little longer than overnight, and when they came back, discovered a magical intoxicating elixir underneath the layer of beeswax!


Mead is just that super simple to make, or it can get complicated. Traditionally, mead needed a very long aging process before it tasted good. That's because there's not the perfect balance of nutrients to sugar for the yeasts, and they ferment under stress slowly. There's also things besides yeast, like a multitude of bacteria, in honey (it is bee puke, after all...) that also like to eat sugars. All of this means that during the first few years, a mead of old tasted gnarly; hot alcohol that stung going down, with a strange aftertaste or smell.
Brewing & Bottling Mead
hoses, tubes, a siphon cane, bottling wand,

Nowadays we have science on our side and can make a better habitat for our yeast. We can also *not,* and let the mead progress like any old-time mead would. Laura and I are doing both!


I've got a gallon batch of mead sitting on my counter right now. It's about five months old now, and the airlock isn't bubbling anymore, but I'm gonna keep it sealed (checking the airlock for water) until at least next January, when I'll bottle it and let it age even longer.  My "recipe" for this batch was a pint of farmers market honey, a chunk of honeycomb, a few tablespoons unfiltered honey with all the pollen in it, and water. I put a fabric scrap over the top of the jar. I put a real lid on and shook the crap out of it every day for three days until everything looked dissolved and it was starting to get fizzy, and then I stuck the airlock on and basically dropped it out of my mind. This is as old-school of a mead as I can get without keeping bees myself, and I'm excited to try it in several years.


Brewing & Bottling Mead
bottles and a tub to contain drips
You can also get fancy and make specialty meads. The one that Laura and I are bottling today, she made with apple juice and honey. Technically, it's called a cyser. Most common honey+___ combos have names. Honey and spices or herbs makes it a metheglyn; honey and malted grains becomes a braggot; honey and fruit is called a melomel.

We're using recycled bottles, which came with painted Coronita labels. You can see how we removed those last weekend by checking out this post.

Equipment that we used; sanitizer, hoses, tubes, a siphon cane, bottling wand, caps, a capper, and bottles. There's also a tub to contain drips, but a towel laid out works just as well. Even though we're doing just a gallon, bottling is a whole lot easier with two people. We've sanitized these bottles already and they're flipped upside down to drain. One bit of equipment I REALLY want is a bottle drying rack!


Stick the siphon hose down almost to the sediment at the bottom of the jug. Here's where you need nineteen hands: put the bottling wand in the bottle and then pump the thing to start the siphon. The bottling wand has a valve at the bottom, and it's gotta stay open in order for the siphon to start, but both tasks require your full attention simultaneously. Needless to say, we couldn't exactly take pictures during this process, but we did set my phone up to take a video!
Brewing & Bottling Mead
the right amount of room in the bottle


Once the liquid is flowing, start filling bottles. The wand is sized perfectly so that when you pull it out of a *very* full bottle, displacement leaves just the right amount of empty room in the bottle! Set it down for your capper buddy, and move to the next bottle. The wand has a valve on the bottom, so it doesn't spray everywhere between bottles, it this is still a drippy process.


Meanwhile, capper buddy takes the bottle and sticks a new cap in her capper. Our capping things call for a little oil up in the cup, so make sure you read the instructions for your own device! Stick the thing on the bottle, and push the handles down. This forces the cap down around the lid and it crimps itself, making a nice seal and keeping your drink good for several years.


I went ahead and added a few fun links you can check out if you wanna know more about mead, but make sure to visit your local public library and see what they have available there, too! Last time I went I found several books on mead!


Brewing & Bottling Mead

Here's a recipe for a mead that's supposedly ready to drink in a month. Neither of us have tried this recipe, but it seems to be pretty popular and we know not all of our readers have the patience to wait a year or more to drink their mead! It calls for chemicals which you can buy at your local home brew shop, or on Amazon. It's also written with the assumption that the person reading it has all the equipment and experience that comes from brewing regularly.


Here's a recipe for a rather awesome looking mead made with beets! I think this is my next project.

For you linguist nerds out there, here is a great link about the history of the names of mead and what it might mean about the history of the drink.

~ Megan


Readers, have any of you made mead? What's your favorite recipe? I've been winging it so far, but I'd love some recommendations!

Thursday, May 28, 2015

How to Choose Plants

How to Choose Plants
Picking what plants to grow is not like picking what wine to drink.
While picking the one with the prettiest picture, or the coolest name might seem like a good idea, it does not always turn out well.
The first year I tried gardening, the only thing I could get to grow were jalapenos.
I didn’t know anything about gardening. I took the usual “Laura approach” and went in head first. No planning, no research, just determination.
How to Choose Plants
Basil is an herb I LOVE 
I didn’t prep the soil, I didn’t water the plants enough, they were not getting enough sun…it was a complete disaster.
How to Choose Plants
Blackberries from Megan! 
Looking back, it’s a wonder I was able to get anything to grow.
The next year I did much better. I learned from my mistakes. Also, I did a lot of research.
Here are three of the most important things I learned about starting a garden, vegetable or otherwise.
1.                   Learn about your soil. Not only PH, but how will it drains. I knew that my soil had lots of rocks, I assumed that meant it would drain well. That was not the case. I have about two feet of good soil, then it turns to clay. Clay = no drainage. Also, it is important to find out what parts get the most sun. I was going to have my vegetable containers on one part of the deck, but after watching how the sun moved across the deck I ended up moving them to the other side, because it got twice as much sun.
How to Choose Plants
Apple tree, year 1 
2.                   Don’t plant things you don’t want or in the case of veggies, won’t eat.
Jalapenos for example, I like them, but I don’t love them. After I had my fill I started taking them to work and leaving them in the break room. Eventually even the people at work stopped taking them. This year I plated blackberries. I know that they are going to get huge and they are going to spread and take over the area. I have prepared and planned for this happening. If I done the usual “Laura approach” I could have gotten myself it into a horrible mess.
3.       Know you weaknesses. If you know you will not be able to spend a lot of time in the garden don’t plant something that is high maintenance, like roses.  Before the hubby and I were dating he bought a house that had three big rose bushes out front. He didn’t know how much extra care they require. Needless to say I had a fairly large project when I moved in.
~Laura

How to Choose Plants
Baby grapes! 


What important gardening lessons have you learned? Let me know in the comments.
>